

Night Shift, Dark Mode, Reduce White Point, and Zoom's Low Light Filter all help reduce the harmful effects on your body's clock that bright iPhone and iPad screens have at night. But there's another option on iOS and iPadOS that turns your entire display red, and it's useful for so much more than just late-night browsing in bed.
The brightness slider, Reduce White Point, and Zoom's Low Light Filter all dim the display, but Night Shift cancels out blue light frequencies, resulting in an orange hue that can help you get to sleep more easily (though that is still up for debate). Dark Mode switches all the bright whites to black or dark gray colors, putting less stress on your eyes.
Color Tint, the feature discussed below, overlays your entire screen with a colored filter, such as a pure red filter, which has its own benefits.
Red light is more challenging to see than other light frequencies, so it tricks our eyes into thinking it's less bright than it really is. That means you can look at a red screen in a dark room, and your dilated pupils won't have to adjust as much to the light. Additionally, when you look away from the red screen, your eyes adapt much more quickly to the darkness around you.
Apple's hidden Color Tint feature could be helpful for using star map apps for amateur astronomy, sneaking a quick peek at your iPhone in a movie theater, or just checking your device when you wake up in the middle of the night. You could even use your iPhone's screen as a makeshift red-lens flashlight for red-light readable paper maps, which are common in the military. And as a reader pointed out, many animals have a hard time seeing red, so a red filter will let you use your iPhone or iPad while hunting at night.
Step 1: Enable Red Tint
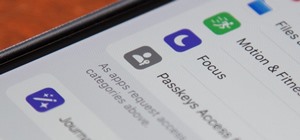
Simply go to the Color Filters menu buried in Settings to try out the hidden feature. On iOS 17 or iPadOS 17, head to the following location in your preferences. This is also where you'll find it on older software dating back to iOS 13 and iPadOS 13, though Color Filters' first appearance was on iOS 10.
- Settings » Accessibility » Display & Text Size » Color Filters
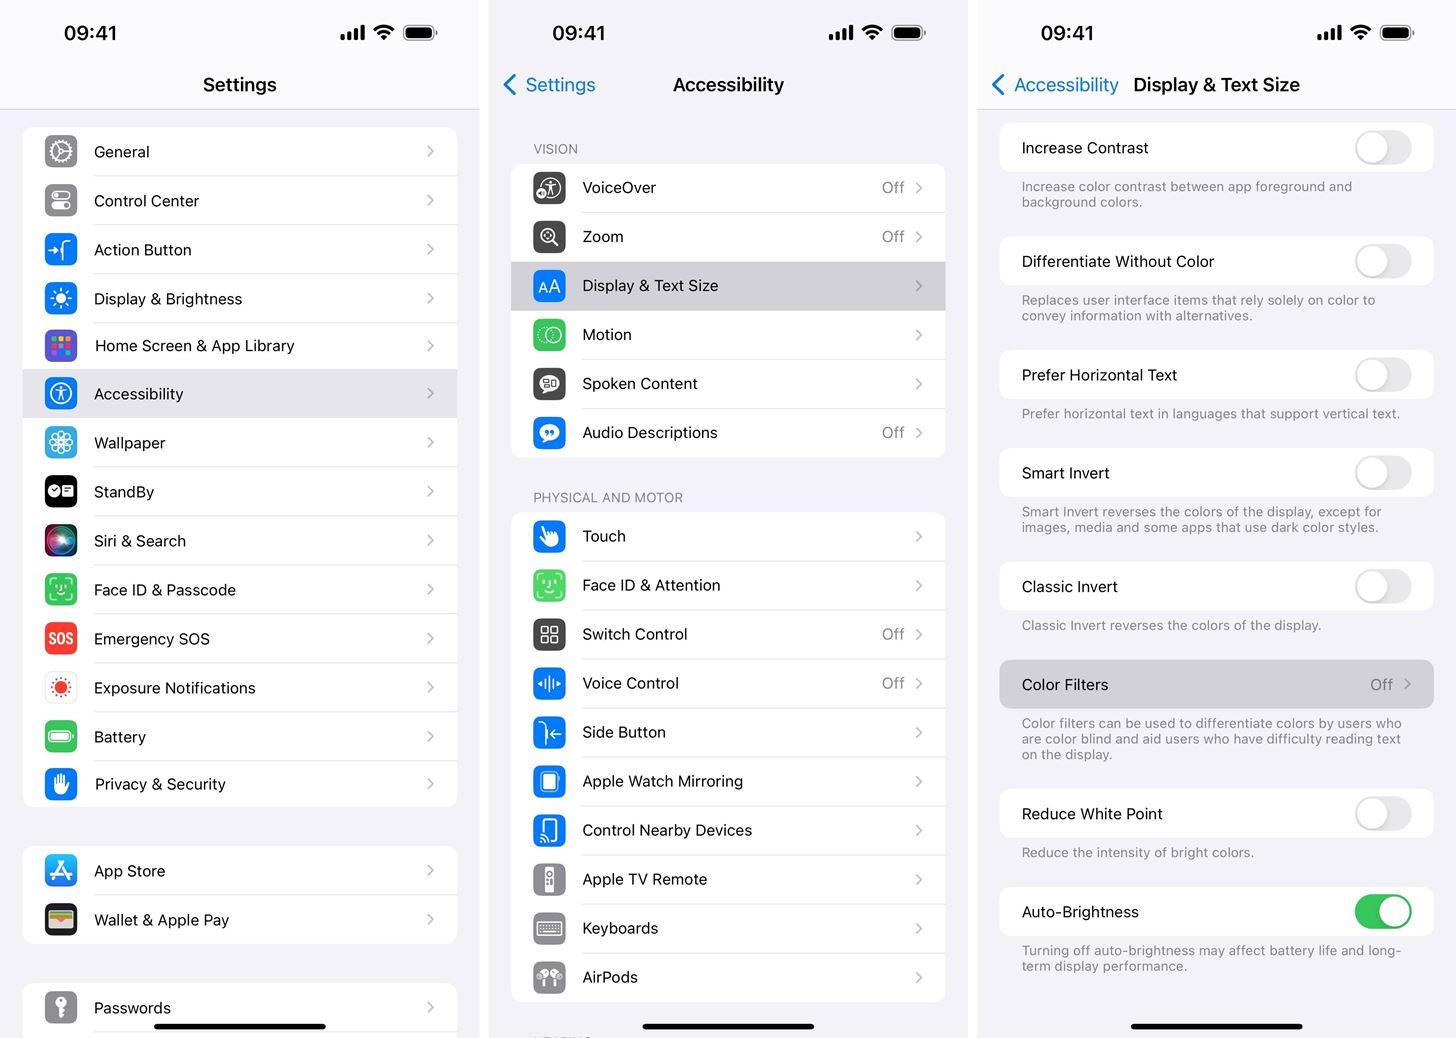
Next, toggle on the "Color Filters" switch and select "Color Tint" as your filter. The Intensity and Hue sliders should be in the far-right position to get the full red screen effect, so move the controls on those if they're not already there.
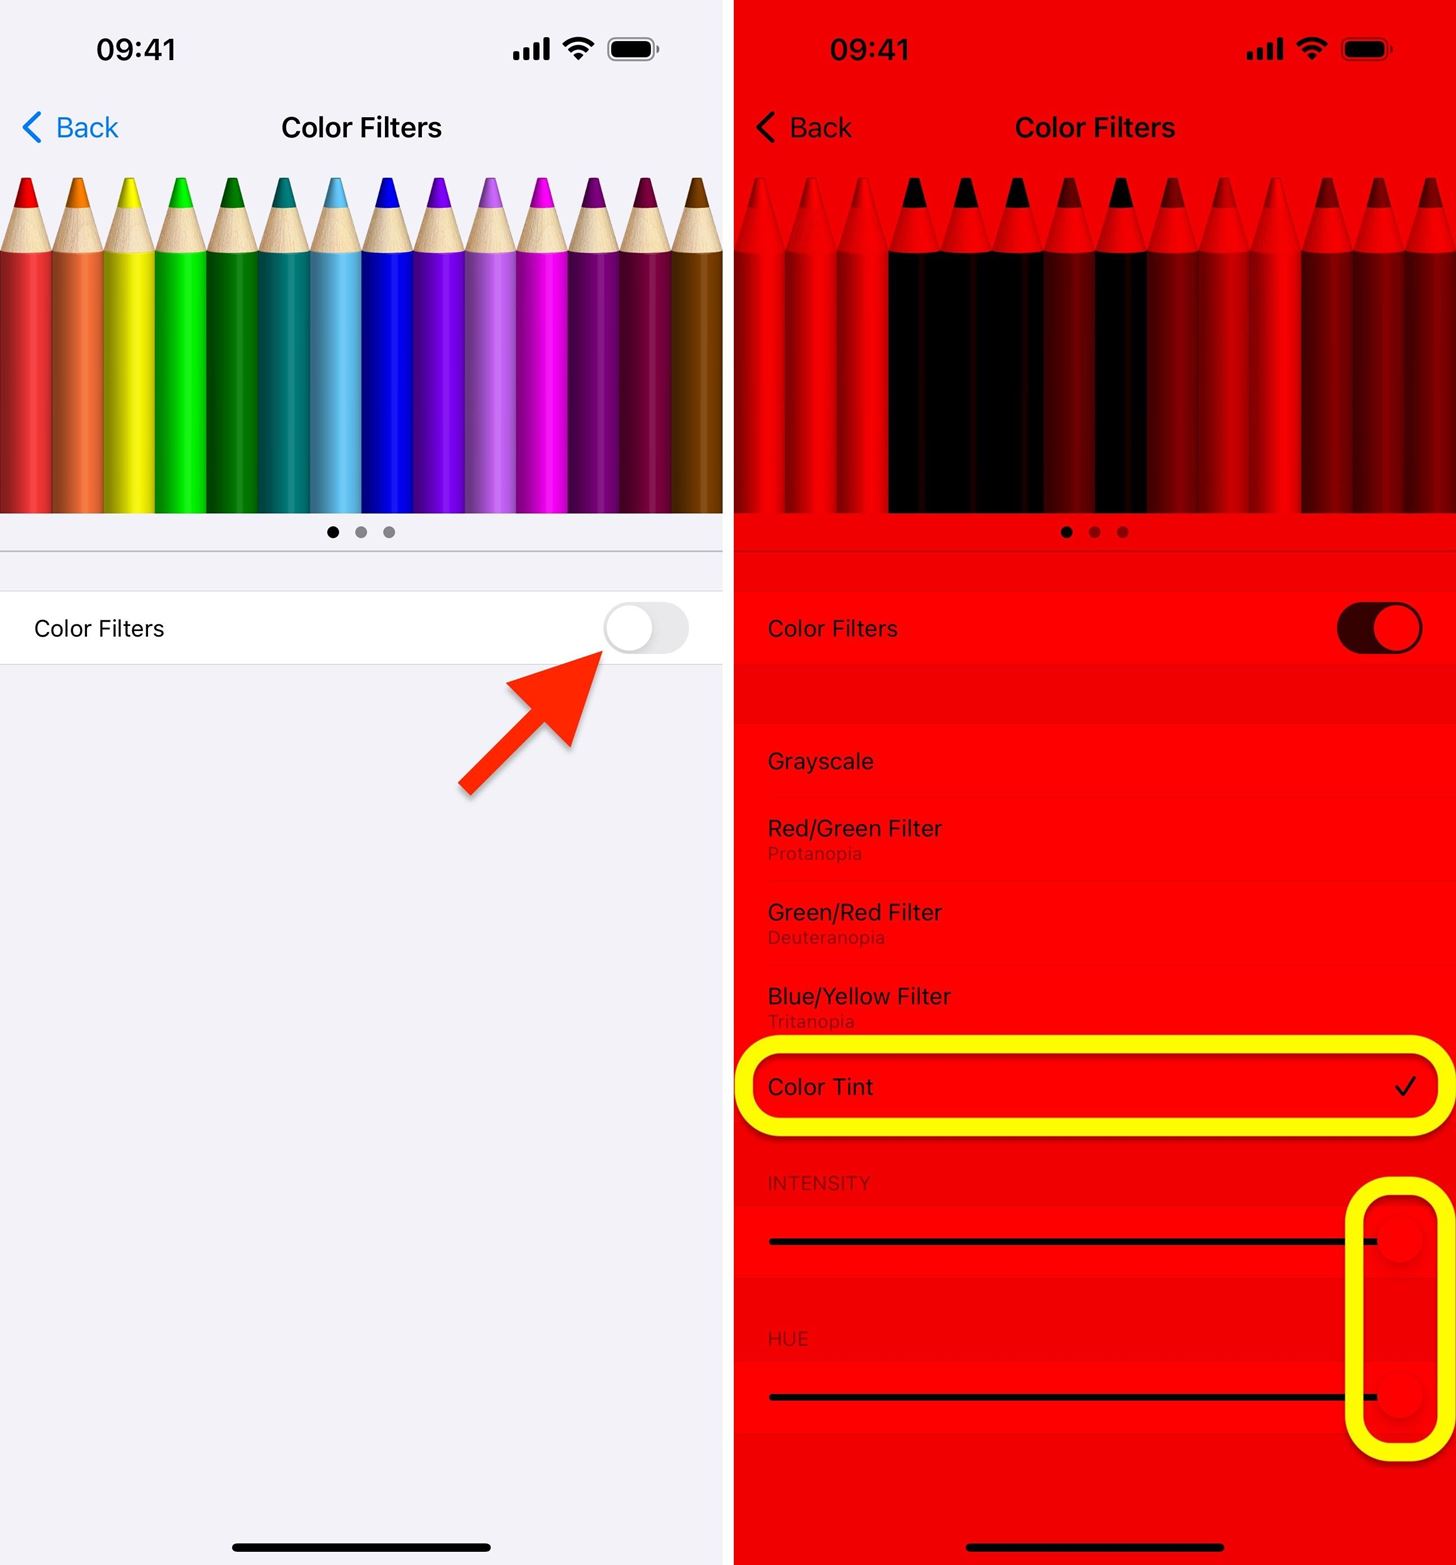
You can't capture the effect in screenshots (the above image simulates the color that appears), but it's certainly dramatic. And because your iPhone or iPad emits only red light, it will be much easier to use in dark environments to maintain night vision without shocking your eyes.
Step 2: Add a Shortcut for Your Red Tint (Optional)
If you want to go back and forth between your new red tint and regular bright non-tinted screen, it'd be pretty inconvenient to keep going into the "Color Filters" menu in Settings to toggle the red filter on or off. To turn the red screen on or off faster, you have a few options:
Option 1: Accessibility Shortcut (Triple-Click)
With the Accessibility Shortcut feature, you can triple-click the Side, Home, or Top button on your iPhone or iPad to switch between the standard screen and red tint. To set it up, go to the "Accessibility Shortcut" menu at the bottom of the Accessibility settings. Choose "Color Filters" from the list, and you're done.
- Settings » Accessibility » Accessibility Shortcut » Color Filters
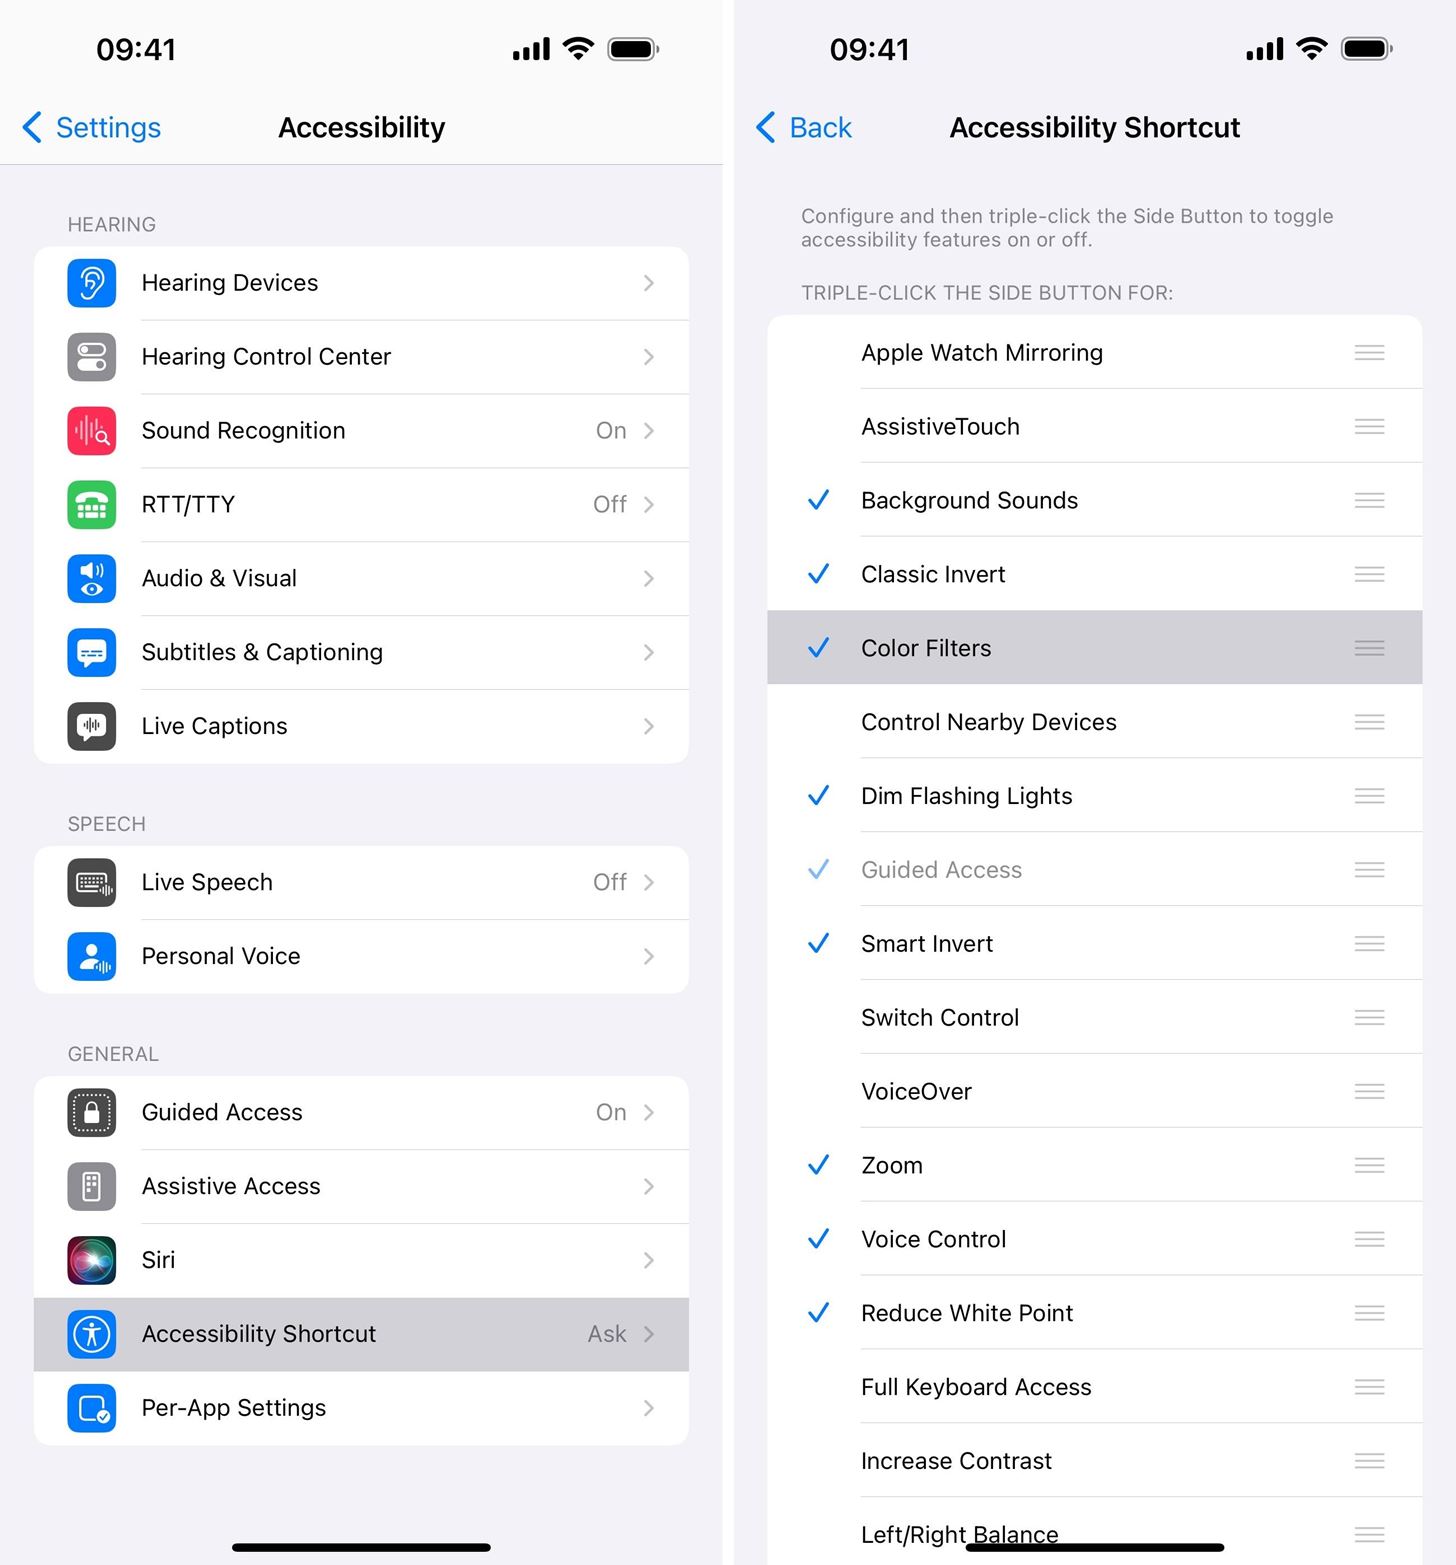
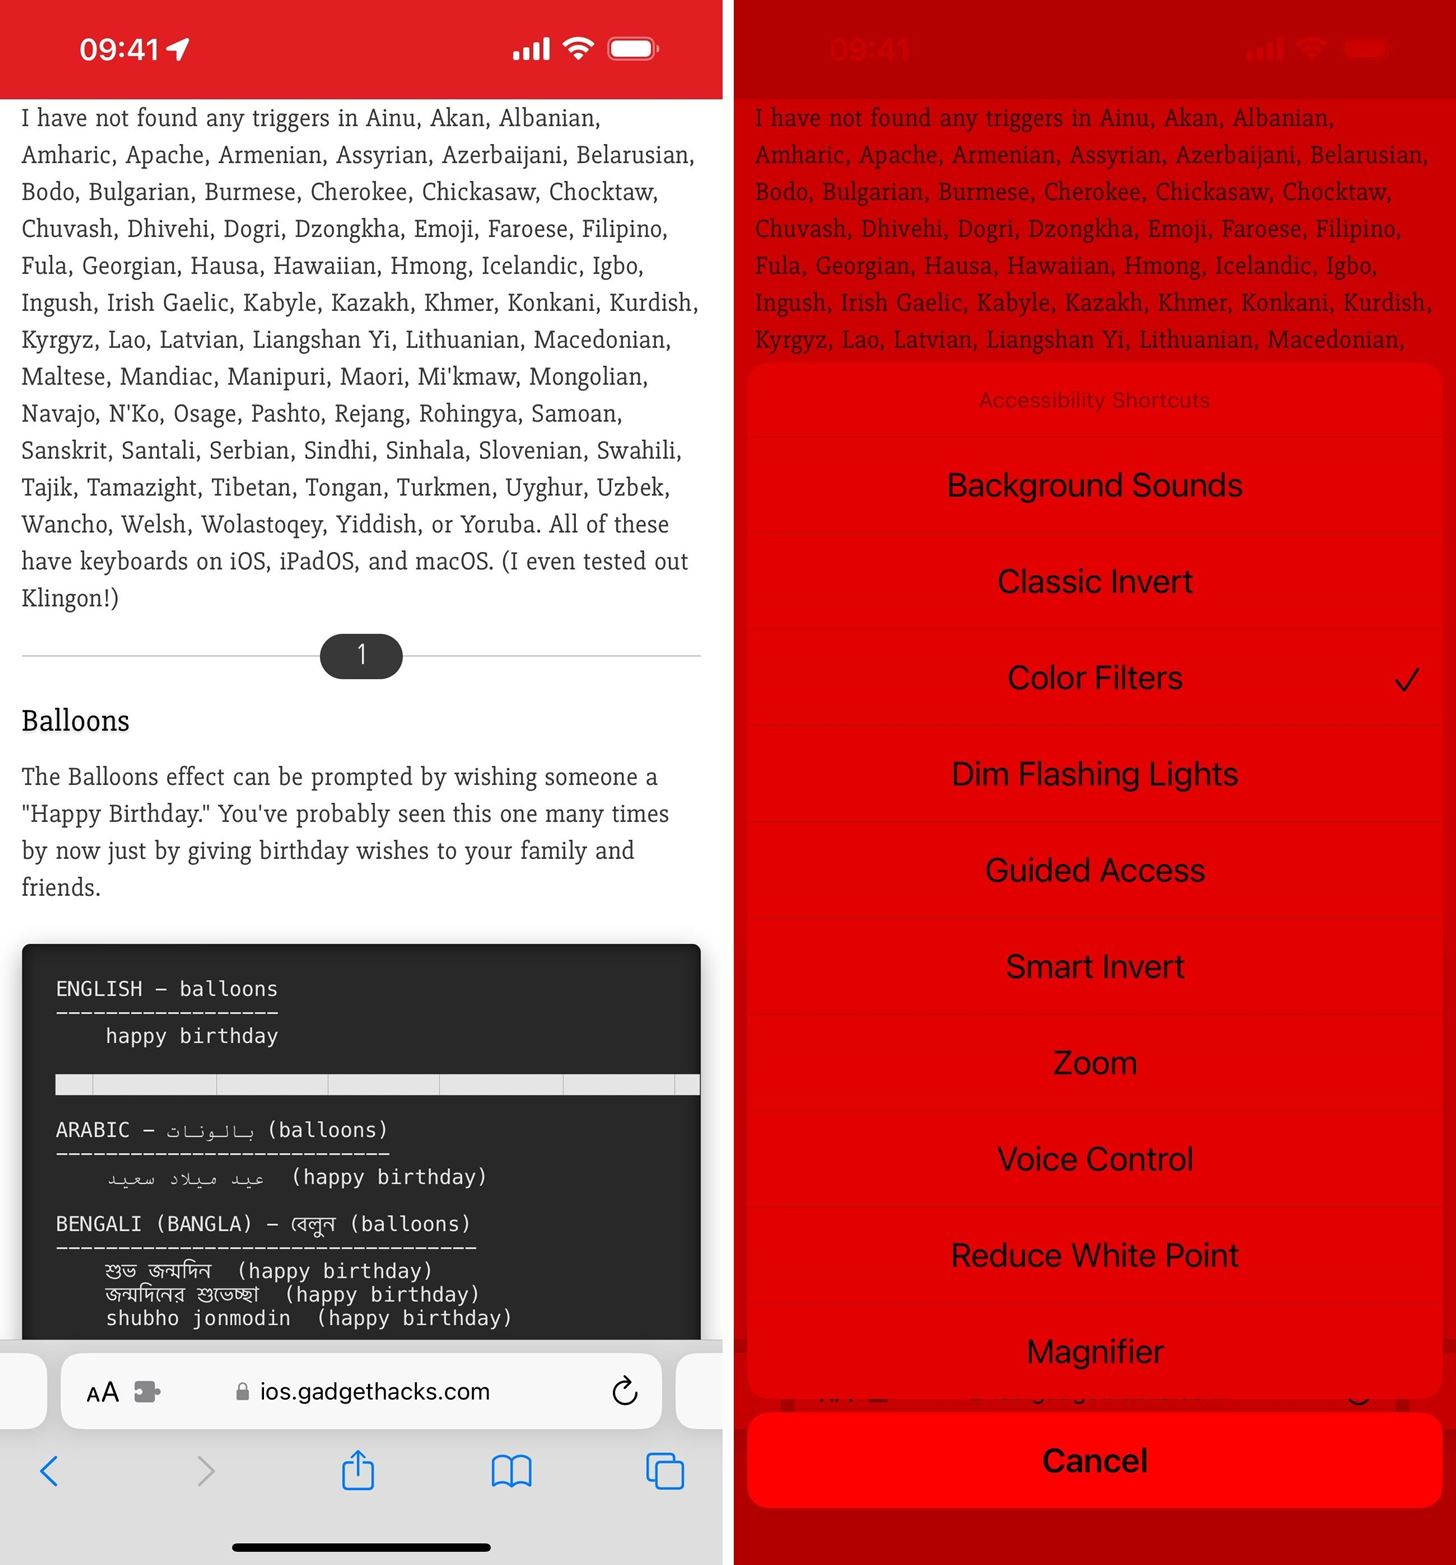
If you've enabled two or more options for the Accessibility Shortcut, such as Color Tint with Background Sounds, Magnifier, Smart Invert, Voice Control, or Zoom, a menu will appear when you triple-click. You'll need to choose "Color Filters" from there. It's a little slower but necessary if you like using a lot of these cool triple-click shortcuts.
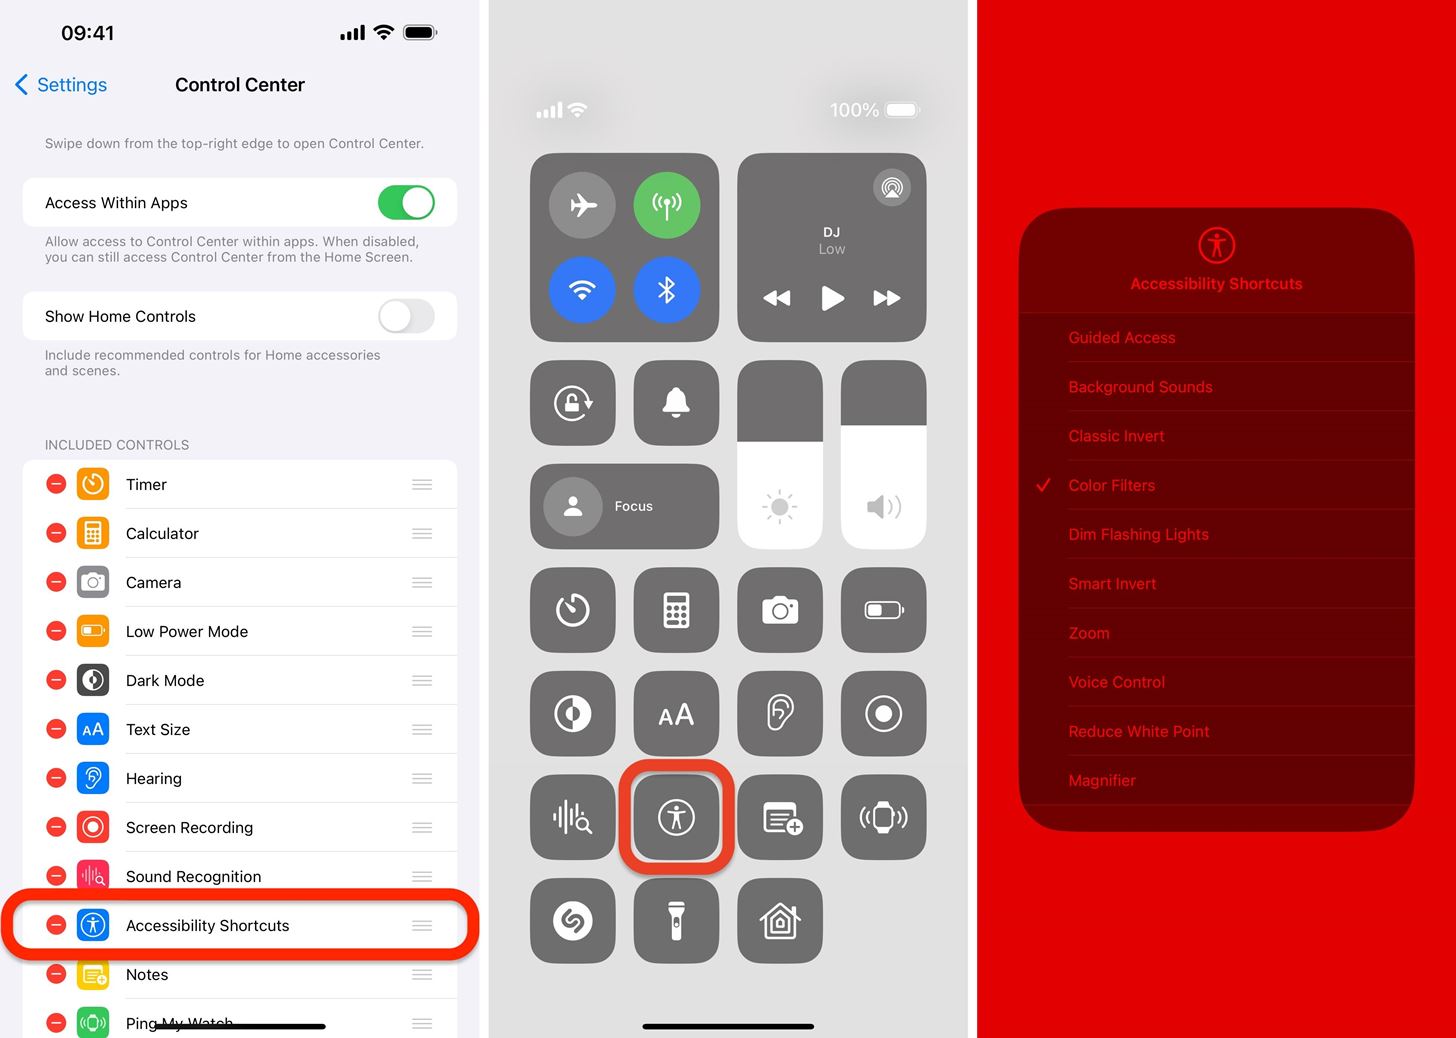
Option 2: Accessibility Shortcut (Control Center)
If you're a big fan of Control Center, you can add the Accessibility Shortcuts control to it and access Color Filters from there. First, you need to follow the instructions above in Option 1 for assigning Color Filters to the Accessibility Shortcut. Then, add the proper control for Control Center if it's not already there.
- Settings » Control Center » Accessibility Shortcuts
If you only have Color Filters assigned, tapping the Accessibility Shortcuts control in Control Center will toggle it. Otherwise, a menu will open, and you will have to select Color Filters.
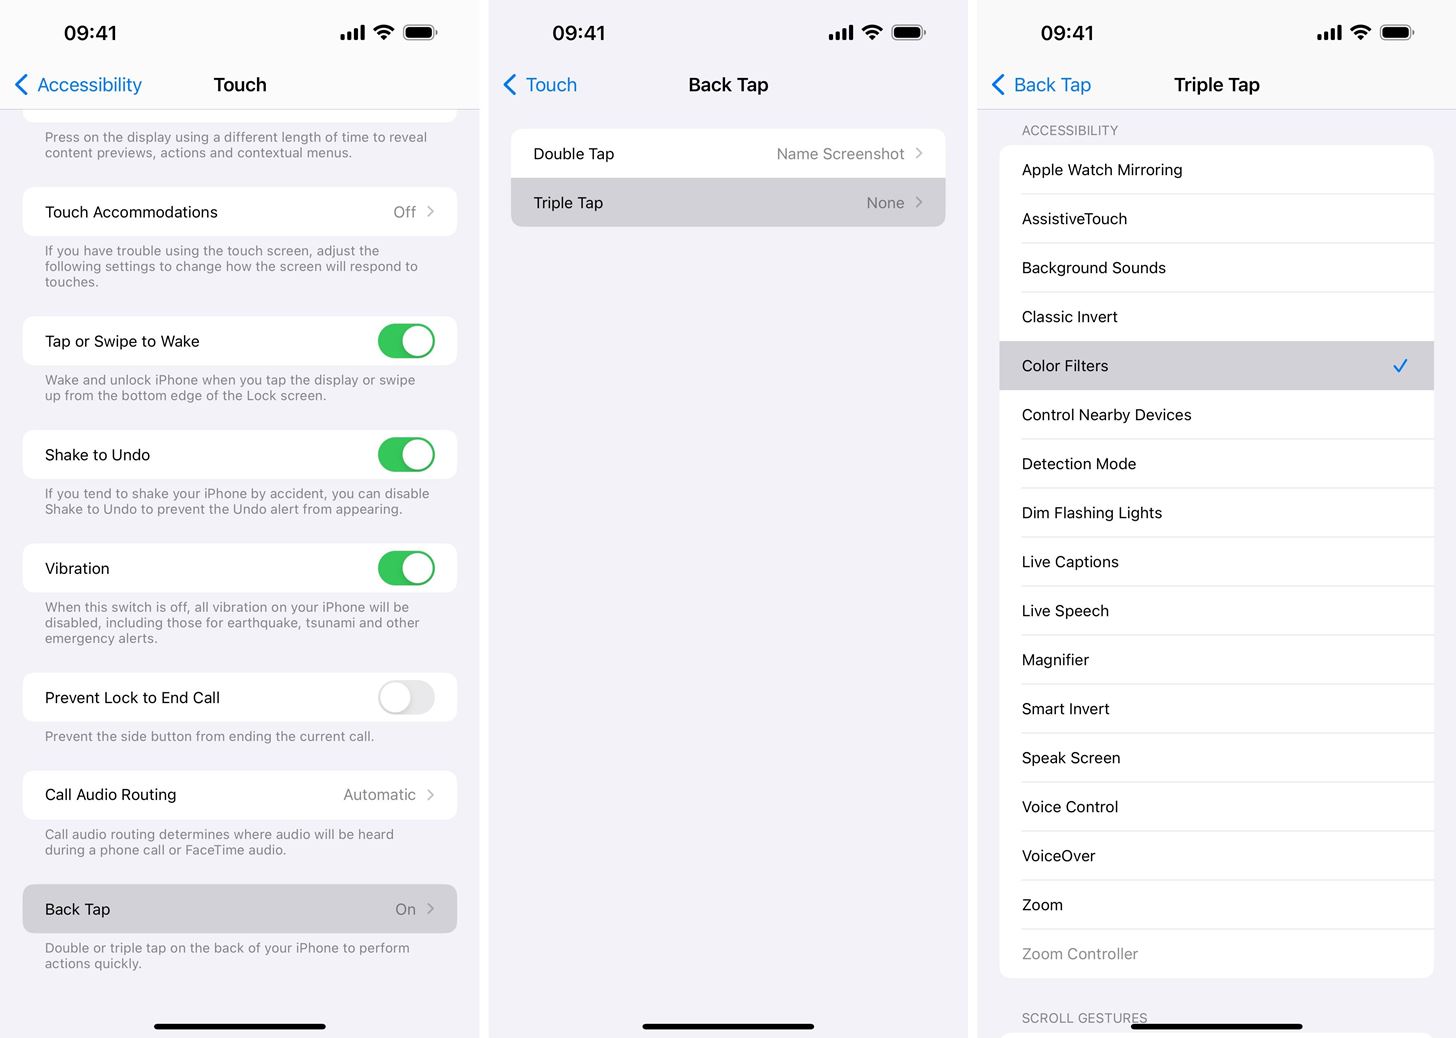
Option 3: Back Tap (iPhone Only)
If you don't like using Control Center or triple-clicking your iPhone's Side or Home button, you can use the Back Tap feature instead. This only works on iOS 14 and later. Go to:
- Settings » Accessibility » Touch » Back Tap
Choose "Double Tap" or "Triple Tap" and assign "Color Filters" to it. Then, you'll toggle your red screen filter on or off whenever you double-tap or triple-tap the back of your iPhone.
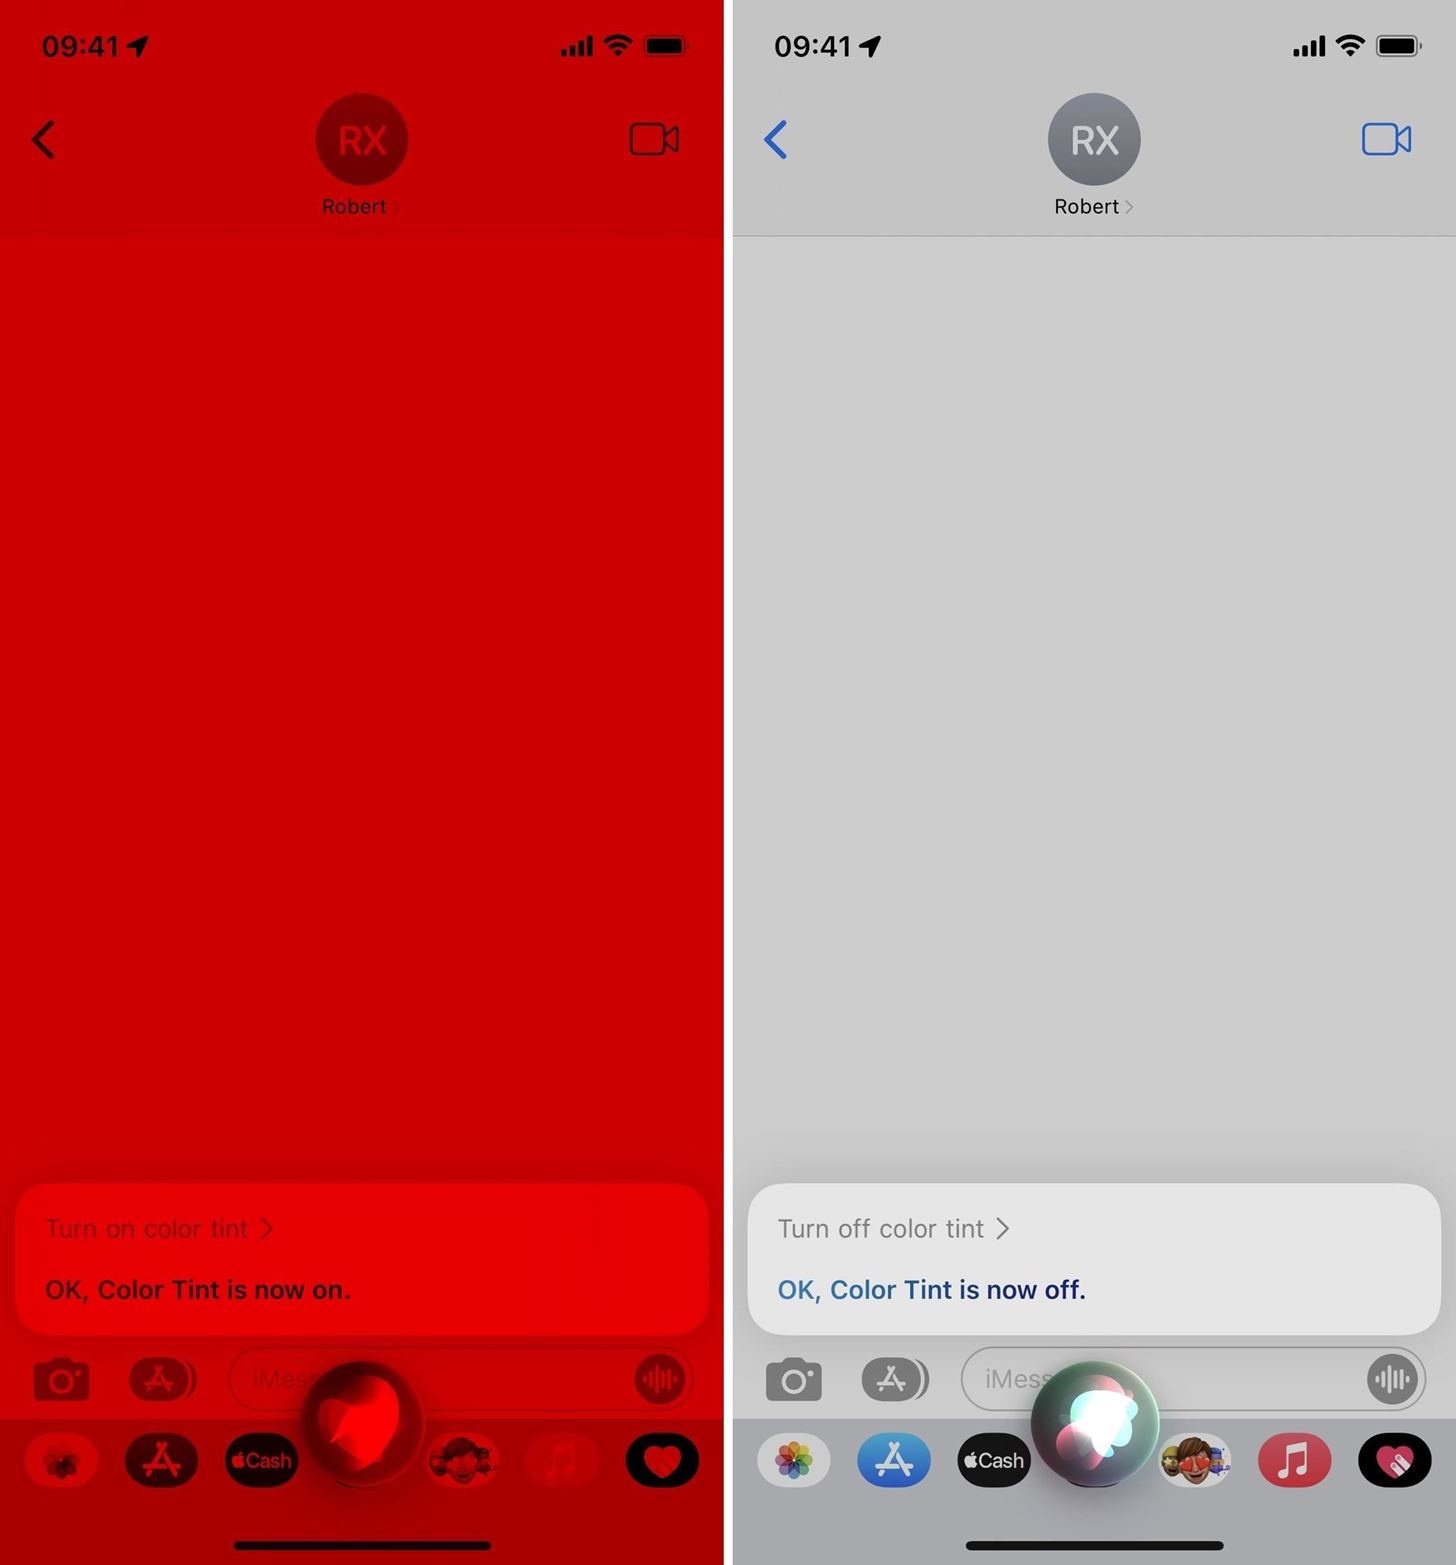
Option 4: Siri
You may also be able to use Siri to toggle the red filter, but it only seems to work on iOS 15 and iOS 16, as well as on iPadOS 15 and iPadOS 16. You may also have success on iOS 17 and iPadOS 17.
Say "Hey Siri" or, as of iOS 17 and iPadOS 17, just "Siri" with one of the commands below to enable or disable it. If you don't use "Hey Siri" or "Siri" voice activation, long-press the Side, Home, or Top button, and say the command without the vocative.
- "Turn [on/off] Color Filters."
- "Turn [on/off] Color Tint."
- "Turn Color Filters [on/off]."
- "Turn Color Tint [on/off]."
- "[Enable/disable] Color Filters."
- "[Enable/disable] Color Tint."
- "Toggle Color Tint."
If you use the Home app to control smart lights and other smart products, Siri may think you're talking about a room or HomeKit or Matter accessory instead of the Accessibility tool. To avoid this, see Option 5 below. On 17.0 and later, Siri frequently says it doesn't understand or can't perform the action even without Home set up. If that's happening to you, you'll also want to look at Option 5 below.
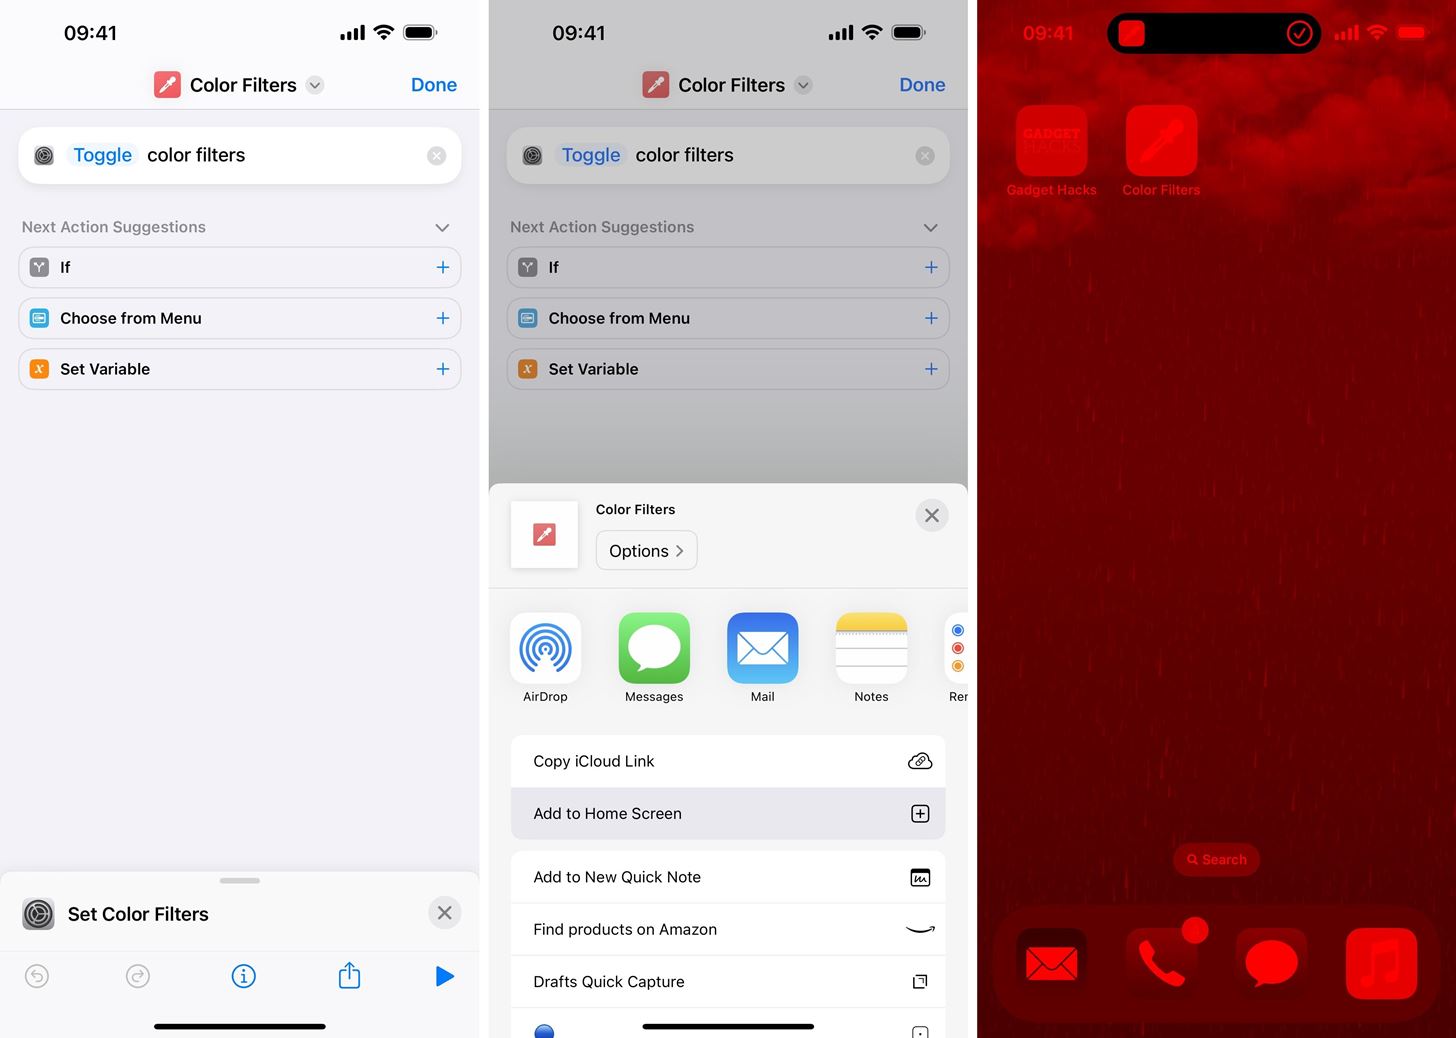
Option 5: Custom Shortcut
On iOS 15 and iPadOS 15 and earlier, the Shortcuts app does not have any actions to toggle Color Filters or Color Tint, so you can't create a Home Screen button to press whenever you want the red filter. However, iOS 16 and iPadOS 16 and later do have a "Set Color Filters" action.
For the most straightforward implementation: Start a new shortcut, add the "Set Color Filters" action, and change "Turn" to "Toggle." Then, tap the shortcut's current name, choose "Rename," and rename it if you'd like. Whatever name is here will also work as a Siri command (see Option 4 above).
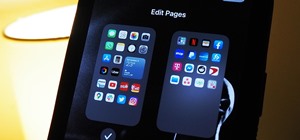
After renaming or not, tap the share button and select "Add to Home Screen." Alternatively, you can tap the info (i) button in the bottom toolbar of the shortcut editor and select "Add to Home Screen." Or you can tap the shortcut's name and hit "Add to Home Screen."
Change the icon if you wish, then tap "Add" to see its icon on your Home Screen. Tap that to turn on the color tint, then again to turn it off.
Just updated your iPhone? You'll find new emoji, enhanced security, podcast transcripts, Apple Cash virtual numbers, and other useful features. There are even new additions hidden within Safari. Find out what's new and changed on your iPhone with the iOS 17.4 update.


2 Comments
Excellent column for the many hunters across the world. Most animals have difficulty seeing red light. So, if you are hunting at night (where legal) you can also use your iPad without fearing that game animals, like deer, will see the light coming from your iPad.
Great point. Definitely something we should have included as another practical use for the red filter.
Share Your Thoughts